Creating Lists in clinFHIR
August 3, 2015 Leave a comment
As we’ve just discussed, clinFHIR allows you to quite easily create resources based on profiles (whether the ‘core’ resource profiles or simple ones created by clinFHIR) but what about more complex structures like Lists?
Well, it’s not particularly hard to do, though a bit fiddly (since it’s not optimized for that). The trick is to first create the resources you want to appear in the List, and then create the List resource, referencing those resources as entries. (If you forget, you can always ‘park’ the List and then create the other resources of course).
Here’s a step by step guide.
Lets assume we’re creating a Problem List (in FHIR that’s a list of Condition resources).
Start clinFHIR and load the resource Builder. Select (or add) a patient, and then select the Condition core profile.
Enter the details for the Condition in the usual way, and save the Condition.
Repeat for the number of conditions you want to create. There’s a trick you can use to speed things up here. Create and save the first Condition. Then, while the Condition is still in the builder, just make any changes you want (like a new code) and re-save. You’ll get a new Condition without having to re-enter any of the common elements. If you do want to start from scratch though, just click the ‘clear’ button, then re-select the resource type.
Once you’ve created the Condition resource, Select the List resource type. Set the elements you wish to (like status, mode, note etc) then click on ‘Show Child’ in the List.entry row.
The display changes quite significantly – as the picture shows:

What’s happened is that we’re not just adding a single element – this is a whole new ‘branch’ of the resource which has many ‘child’ elements. The changes you’ll note include:
- A new set of elements on the left side
- The ‘bread crumb’ at the top left shows that you are now in a branch of the resource – it’s the first ‘entry’ branch
- At the top right (alongside the ‘Current Element’ label there’s a pair of boxes with a ‘1’ and a plus (+) symbol. This is used to navigate between branches – the ‘+’ will allow us to add more branches, as we’ll see later.
If you compare this with the layout of the List resource you can see what’s happening:

The ‘entry’ element contains a number of child elements – just as the tool is showing.
You can set the value of individual elements just as you’ve already done.
The List.entry.item element is a bit special. It’s a resource reference, but unlike most of the others, you can add any resource type – not just a specific set like List.subject. When you click on the word ‘–>Resource’ you will get 2 drop downs on the right.
- The one on the top lists the resource types that are references by this patient
- The bottom one shows the actual resources of the type selected in the first box.
Heres a picture:
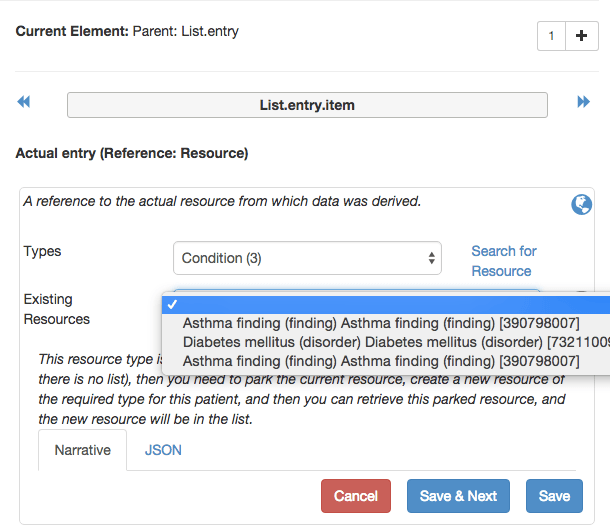
So first select the type (Condition) in the first dropdown, then the actual Condition resource in the second. (The display might just have the name of the resource type in it, rather than something more sensible. You still see the details before you add the resource, but it’s tedious. This is because the ‘sensible’ display needs to be coded for each resource and I haven’t done them all yet. Drop me a line if one you want is missing).
Once you select the Condition you want, you can view the narrative or the JSON, and then click ‘Save’ to add the resource to the List. As usual, the resource you’re building (the List) is displayed.
But what if you wanted to add a resource that is not usually referenced by a patient – such as a Practitioner, or a RelatedPerson? Well, If you click on the link ‘Search for a Resource’ you will get the usual search box, but as the resource type is not yet defined, you need to select the type from the dropdown first, then you will get the search form that allows you to find the specific resource. (This is a good example of using the conformance resource to find out what search parameters the server supports). Note that the search is only for Core resources, Profiles will come later.
In order to add a second (or subsequent) entry to the List, click on the ‘+’ symbol at the top right. A number ‘2’ will appear in the box, and the breadcrumb will also change to entry (2). This tells you that you are on the second branch – so you can select the next condition to add to the List. (Actually you can add any resource you want. Unless profiled, FHIR doesn’t have any rules about what resources are in lists. We might talk about this type of profiling – which is a form of slicing – another time).
It’s quite possible to edit the contents of a branch by clicking in the numbered box (it’s a page navigator) at the top right (the breadcrumb always tells you which branch you are on). Actions you take always operate on the currently selected branch.
When finished, save the List resource as you would any other.
So that’s how you can create Lists in clinFHIR.
You do need to be aware that it’s not currently possible to edit a resource in clinFHIR – this means if you create the list and then want to add another resource you need to create the whole list again. There’s one exception – if you’ve only just saved the List when you realize you want to add another and still have the List in the builder then you’re good to go – just add the new resources and save the list. You’ll still get a new List, but it will have the ones from the previous list.
Once Lists have been created, they are fun to visualize in the resources display tab – we’ll talk about that soon.
Recent Comments