Creating reusable scenarios using clinFHIR
September 19, 2015 Leave a comment
One of the main reasons for developing tooling to support the clinical Connectathon (now re-branded as clinicians on FHIR) was for Clinicians to use it to ensure that FHIR would meet clinical needs, using specific scenarios as ways of testing it. (Actually our initial scenarios were far too big – but that’s all part of the learning process!)
At the events, we have groups of clinicians that take a scenario and then build sets of resources that could represent that scenario using a test patient – often there is more than one way we can do this, and one of the purposes of the event is to develop ‘best practice’ guides. One of the things that would be nice to do is to be able to save – and then reload – these scenarios so that they can be shared with others and examined outside of the event. (It would also help negate the issue that all this work is saved in test servers that are periodically cleared).
Conceptually, this isn’t all that hard to do. While there are many different approaches, one way would be:
- Create a new patient (so that we nicely encapsulate the set of resources we are creating)
- Create the resources needed to for the scenario. This can be done over several sessions.
- Copy all the resources into a bundle and save it somewhere.
- Then, when we want to copy the scenario to a different server, or reload after the server has been refreshed, ‘replay’ the bundle as a transaction against the target server (assuming that the target server supports transaction processing).
It wasn’t too hard to build, but in practice there were a few wrinkles to work through.
We start by using the ‘Fetch Patient Record’ operation to get all the resources that had been created for the patient. Effectively this returns all the resources in that patients compartment. (We could do this ‘resource by resource’, but that would be a lot more tedious – let’s make the server do the work!)
Because the target server will create new identities for the resources, it is then necessary to traverse the bundle and replace all the id’s – and the references to those id’s – with temporary ones that maintained the references within the bundle. This isn’t quite so straightforward as it was in DSTU-1 (the ‘cid:’ prefix was easy!) but I’d blogged about this before so was reasonably straightforward.
Because this bundle is potentially going on to a different server, it is also necessary to include in the bundle those resources referenced by resource, but which don’t directly reference the patient (i.e. they are not directly in the patient compartment). For example, if you set Condition.asserter, that can reference a Practitioner resource – which needs to be retrieved separately and added to the bundle. (Note that according to the spec – the server responding to a $everything query should return these referenced resources as well, but not all servers that support $everything are doing this at present, and it doesn’t hurt to check).
A nice touch is to make this latter step a ‘conditional update’ rather than a straight Create, using the identifier of the resource (if it exists). That way the target server can avoid duplicating these ‘reference’ type resources if it already knows about them.
When ‘re-playing’ the bundle against the target server, you will want to create a new patient – and it’s a nice touch that the name can be entered before the replay – rather than just using the patient details that the scenario was created against.
So let’s see how this all worked out in practice. We’ll use clinFHIRs ability to switch servers to create a scenario against one server, then replay it against another.
Here are the steps to follow to create a scenario.
- Start clinFHIR
- From the Welcome screen, select the ‘source’ server by clicking on the ‘Show Servers’ link at the top right of the screen. Change the ‘Data’ server to your source (For example the HealthConnex server ). Note that the ‘Patient’ server changes to be the same – you can set the two to be different, but it’s more common that they are the same (for the moment anyway) so clinFHIR makes it easy for you.
- Load the Resource builder.
- Create a new patient (select the ‘Add new Patient’ tab) and enter the name, gender and Date of Birth. You could select an existing patient, though any resources they already have will be included in your scenario.
- Now create the resources that you need to meet the scenario. It’s fine to do this over several sessions – just remember that all the resources you create will be added to the scenario when you create it. It’s helpful from time to time to check the ‘resources’ tab (top left) to see what’s been created, and how they reference each other. And just a reminder that the resources tab will only show the resources that directly reference the patient. Others – like Practitioner – won’t be in the list. They exist, but aren’t in the patient compartment.
- When finished, select the Scenario builder from the ‘gear’ icon at the top right of the screen. After a short delay, the screen will show the list of resources for the patient on the right, and fields for a name and description for the scenario to the left. The delay is caused by the Scenario Manager loading any resources referenced from bundle resources as discussed above.
- Click the save button at the top right to save the scenario in the internal database.
- And that’s it!
The screenshot below shows what this looks like:

To apply (or replay) a scenario against a server, follow these steps.
- Start clinFHIR
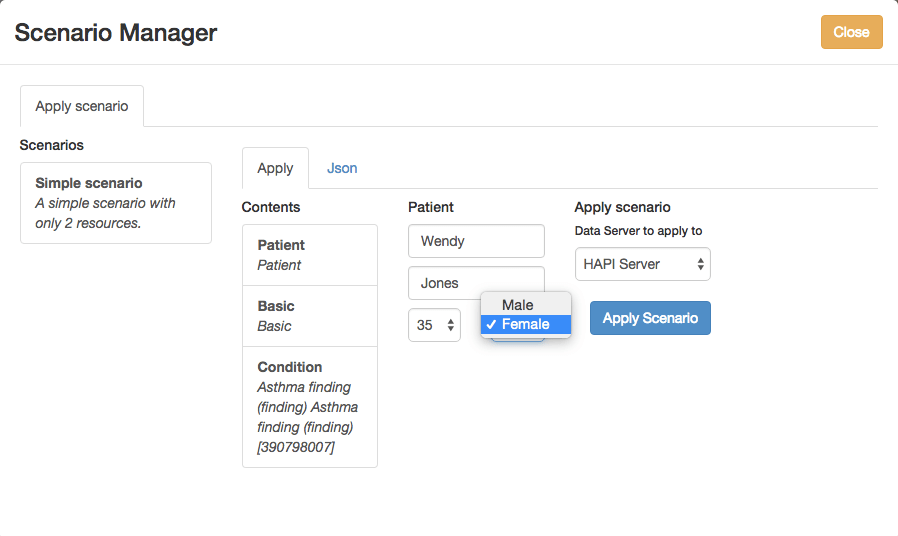
- Select the Scenario Manager (from the ‘Gear’ tab). You should see the ‘apply Scenario’ tab. (If you start the Scenario Manager with a patient selected you’ll also see the ‘Create Scenario’ tab).
- As you can see from the screenshot below, you can then enter the name, age and gender of the patient and the server to apply the scenario to (this doesn’t need to be the same as the currently selected data server). In the example below the ‘HAPI’ server has been selected.
- The click the ‘Apply Scenario’ button. After a confirm dialog (your last chance to abort!) there is a short pause and then (hopefully) a message saying that the bundle has been successfully processed by the target server.
And that’s it! You should then be able to switch to the target server (using the ‘show servers’ link at the top of the screen) and then find and display the patient whose name you entered in step 3 above.
Do let me know if you have any issues or suggestions. Both clinFHIR and the various servers it uses are a bit unstable at the moment (DSTU-2 is only just official) so and bug reports are welcomed! (By the way – clinFHIR does do a fair bit of logging – which you can access from the Activity tab of the Dashboard.)
Recent Comments